


Photo by Roman Synkevych on Unsplash
Git - Github Tutorial (Part 2)
And a practical guide to open source contributions


Table of contents
Note - This blog is a continuation of its first part, if you are new to git and Github and haven't read the first part yet, please follow this link before moving on with this blog.
Undoing Changes in Git
One of the most useful features of any version control system is the ability to “undo” your mistakes. In Git, “undo” can mean many slightly different things.
Undoing Staged Local Changes:- If you have added a new file or modified a file and have mistakenly added them to the staging area, so now they are being tracked by git. You can unstage your changes by running the command
git restore --staged <filename>or if you want to unstage multiple files, rungit resetUndoing Committed Local Changes:- When you make a new commit, Git stores a snapshot of your repository at that specific moment in time; later, you can use Git to go back to an earlier version of your project. But before you begin undoing your committed changes, you need to first look over the history or log your repo. For that run
git log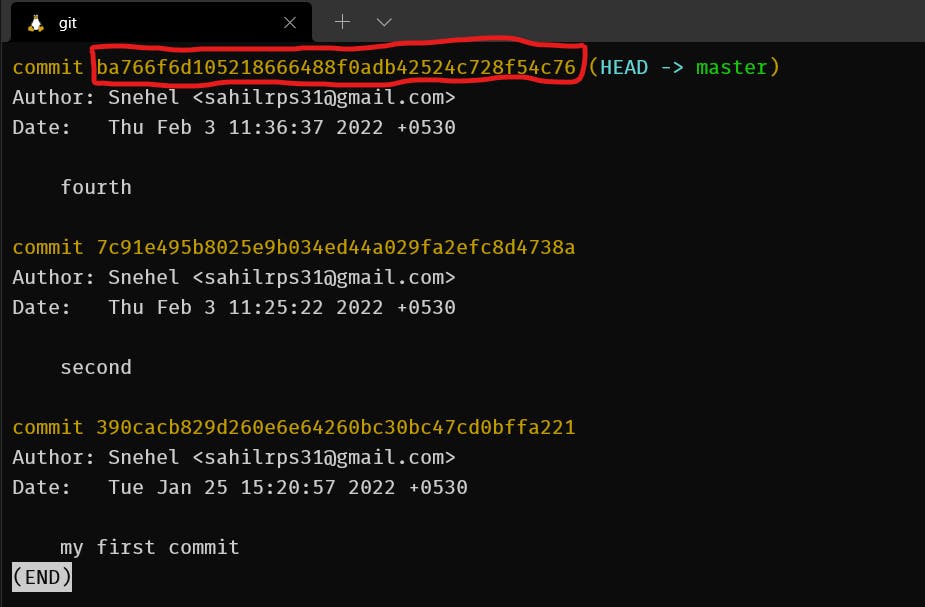 Your commit SHA or id (covered in red) should look something similar to this
Now suppose you have made multiple commits in your repo like A->B->C->D... (starting from commit A and so on to commit D), and you've mistakenly made commits C and D. So you want to go back to that particular period what your repo looked when you made the commit B. In that case, run
Your commit SHA or id (covered in red) should look something similar to this
Now suppose you have made multiple commits in your repo like A->B->C->D... (starting from commit A and so on to commit D), and you've mistakenly made commits C and D. So you want to go back to that particular period what your repo looked when you made the commit B. In that case, run git logand copy the commit id of B. Now rungit reset <commitB-id>. Rungit logagain and you'll find only commits A & B in your repo's history. Now all the changes that were made during commit C & D are put back into the unstaged area, and they are now untracked by git.Stashing Changes:- Now suppose, you've made a few changes and added them, but you don't want to commit those changes, yet you want to keep your repo's working tree clean, for that you can run
git stash. This basically puts your changes backstage. Now you can again call your stashed changes by runninggit stash pop. And If you want to clear all the stashed changes, rungit stash clear.Undoing Remote Changes:- Now you've pushed some of your local changes to the Github repo, and you wish you wouldn't have pushed them, then you can undo that as well.
First, rungit logand find the commit id (let's say B) of your unwanted change. Copy the commit id of the commit (let's say A) just below commit B. Now rungit reset commit-A-idand the changes made by commit B are now in the unstaging area. You can either delete or stash those changes if you want to save them for later.
Now rungit push origin master -f, this will force push your local changes to the Github repo even if your local repo is now 1 commit behind the Github repo. That's why the-fflag here is important.
One more thing to note here is when your GitHub remote repo is a few commits ahead of the local repo, then you can't directly push local changes to the remote repo. Before that, you first need to pull all the changes made by those extra commits present in the remote repo. A command for that isgit pull origin master.
Note - If you have a few files on your local repo that you don't want to push to GitHub, but you also don't want to stash them as you need them for some reference in your local repo, In that particular case you can make a .gitignore file and add the name of those unwanted files in your .gitignore file which you don't want to push.
If you want to learn further details about
undoing changes in git
read this awesome documentation from GitLab.
Or you can refer to this blog as well.
Branching in Git
Throughout this blog, you might be wondering what this master/main is? Now is the correct time to look into what git branches are.
Now all the commits that we make in the repo are linked to each other like a branch structure. Now the master/ main is the default branch of a repo. All the code present in this branch and pushed to GitHub, people are going to see and use this one only. There might be several other branches holding separate code for separate things/bugs in the project, but the code that is present on the default branch is the final one and is used by people.
So whenever we are working on someone else's project, our code that is not finalized yet might contain some errors. That is the reason why we put our code changes in a new branch and push that branch to GitHub rather than pushing it to the main branch directly so that the actual code and users of that project doesn't get affected.
To create a new branch, run git branch <name>. Now whenever we make a new branch, it creates a complete replica of all the code present in the default(master/main) branch into or new branch. Also, all the new commits now being made in the repo will be added to this new branch itself.
To checkout to our newly created branch, run git checkout <name>alternatively you can also run git checkout -b <name>, this creates a branch called and also checks you out to that branch.
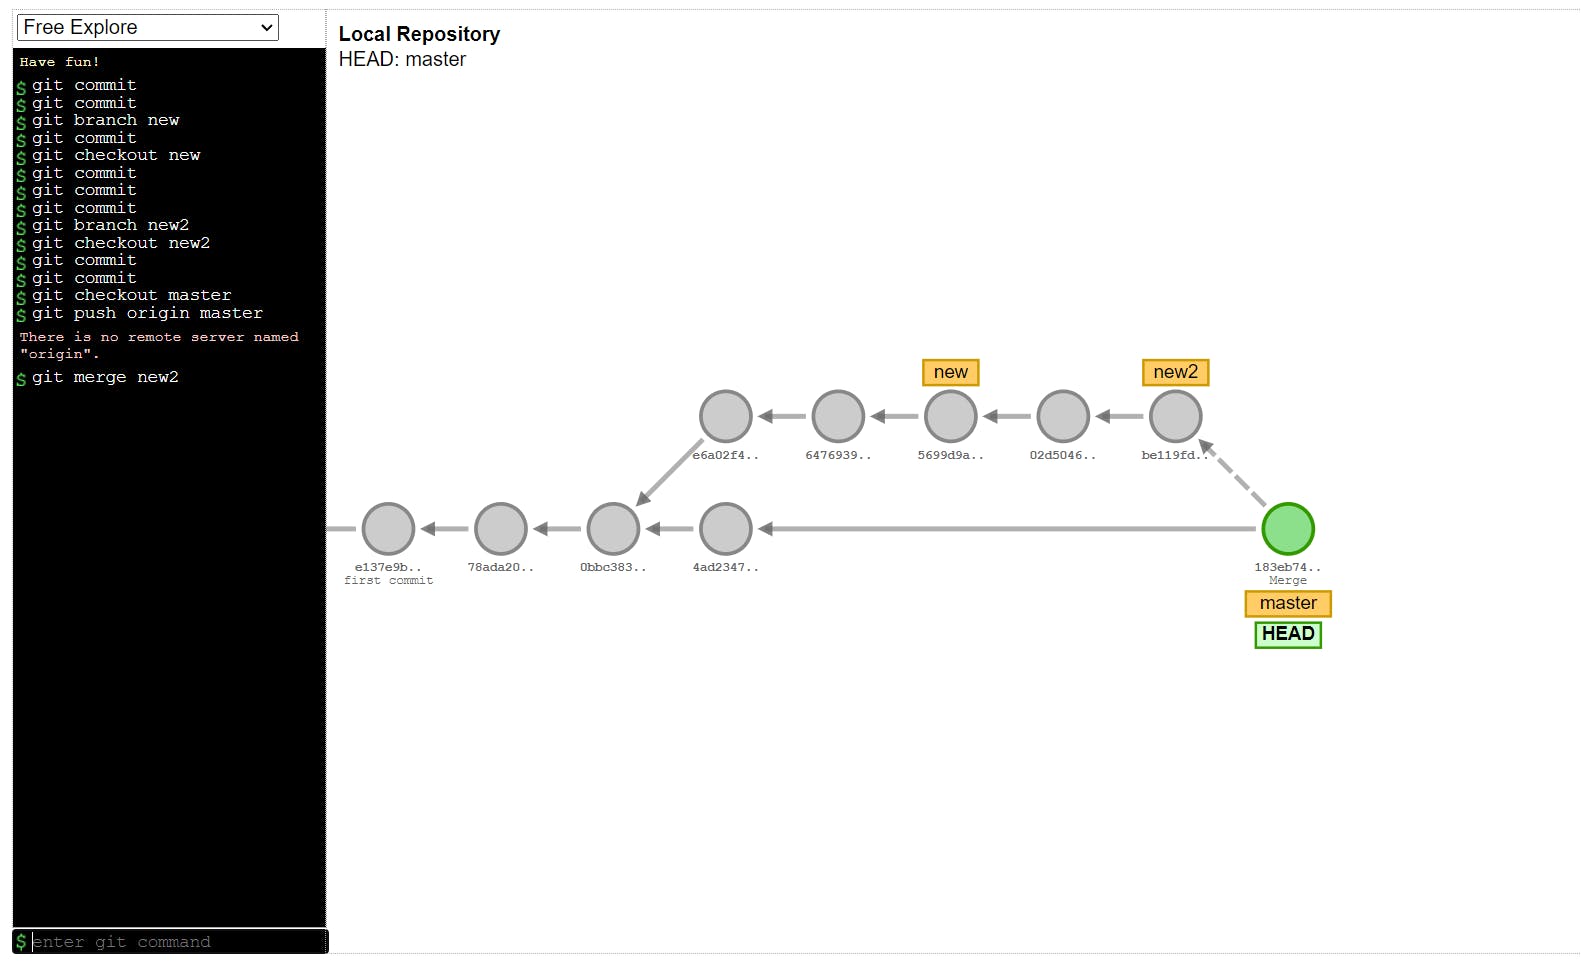
There is a very effective online tool that helps you visualize branching in git very easily. Check that out here.
Contributing to Open Source
What do we mean by Open Source?
From a beginner's perspective, Open source(projects) are some free to use applications developed by a few communities or people around the globe for us, with whom we can collaborate and work on the project's code-base, edit or add new features on it and so on.
For example - Linux, an open-source Kernell, Android used by so many companies and developers like us get to work on these since they are open source and is not owned by any company or something.
There are more examples of open-source like - VLC, Firefox, Chrome, a few programming languages, etc.
Why contribute to open source? What are the benefits?
The most important point is, You get to collaborate with people, in general developers around the world and get some hands-on experience on how things actually work in the real world of the software development field. Also as a beginner, contributing to open source gives you the exposure of how you can practically implement your coding knowledge into doing something productive/developing apps. This helps you build your resume as well and makes you stand a chance among others in a coding interview.
To summarize it all, the benefits include:-
- You get real-world software development experience.
- It's going to enhance your resume very much.
- Helps you with networking as you make connections from around the world.
- Helps you with career growth, getting internships and jobs, etc.
- And above all, the project on which you've contributed, the code that you've written, that will be used by people from different parts of the world which is obviously huge.
How to contribute?
First of all, you need to find open source projects/organizations according to your tech stack. And to find a project, you need to be active on socials, follow tech-related content on social media and obviously keep an eye on what projects people are putting on Github.
There are also various open-source programs in which you can take part, find a project or organization of your choice and make a proposal to them and then start contributing if your proposal is accepted by the organization. You might also be assigned a mentor who will guide you with the organization's code of conduct and will help you with the project's code.
A proposal refers to the proper documentation of why and how you are planning to contribute to the project, what changes you are going to make or add to the project and also your preferred working time-duration.
There are various open-source programs, some of them include - GSoC, Outreachy, MLH-Fellowship, Hacktoberfest, etc and I'm sure you'll find more on your own. Just keep exploring things on the internet.
Things you need to learn before making open source contributions/Working with existing projects on Github:
So before we begin our contribution to open source projects, first you need to learn how we deal with someone else's project on Github and how we can work on them.
Suppose there's an organization named Org that has a project named Prj whose repo is on Github. Now the repo exists on the organization's Github account and others don't have direct access to make modifications to the codebase. Only the project's maintainers can do that of course.
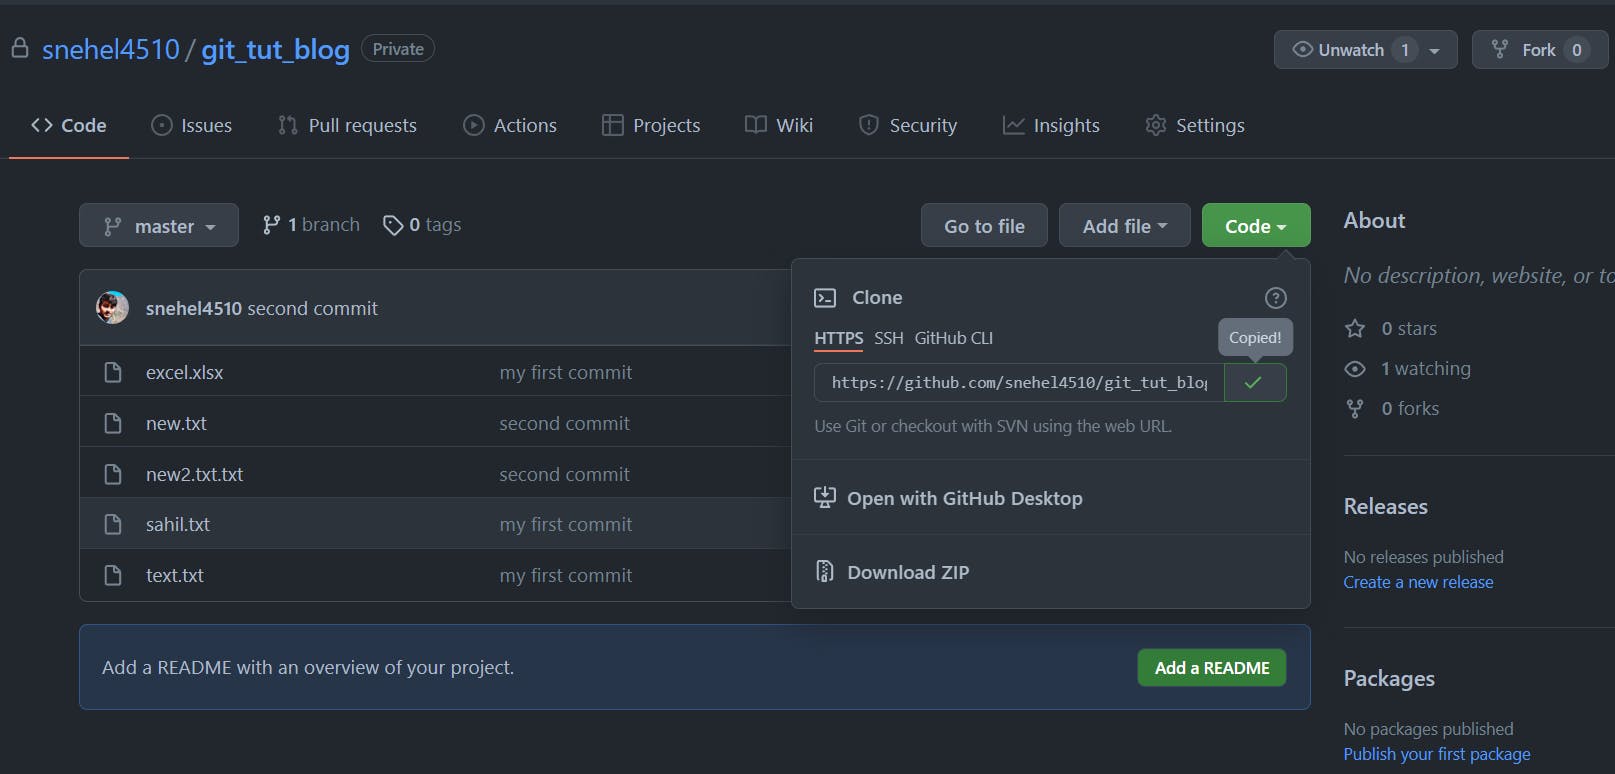
For that purpose, we first fork the repo into our own Github account. This makes an entire copy of the repo into our own account. Now the forked repo is ours and we are allowed to make changes.

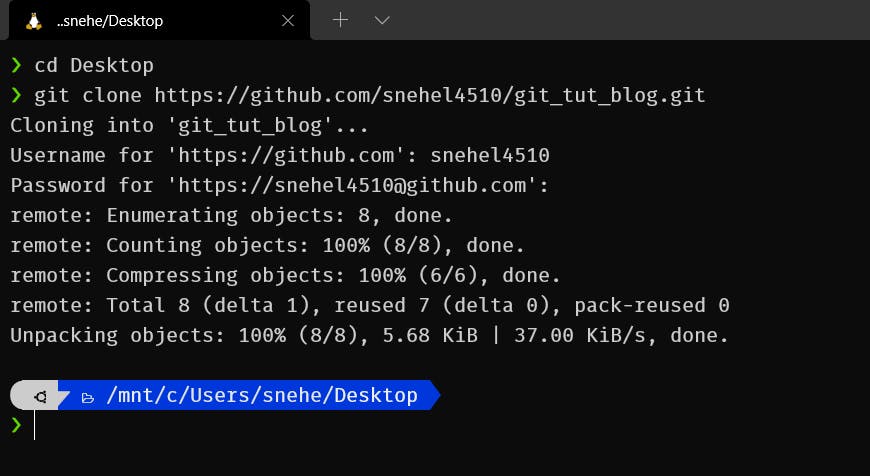
Now you need to copy the URL of this remote repo in your GitHub and then clone it on your local desktop. For that open up your terminal and run git clone <URL>. This command downloads all the files and folders present on the remote and repo and puts them on your local setup so that you can start working with the code.
 One more thing to note, whenever we fork and clone a repo, Origin is by default the URL name of our forked repo while upstream is the URL name of the original repo. So for that, we run the command
 git remote add upstream <URL of the original repo>.
Creating a Pull Request
Now that you've got all the code, you can start making or adding changes to the project. But before making commits, make sure that whatever work you're doing should be done on a separate branch and not on the default master/main branch. This way, even if the project's owner doesn't approve your changes, you wouldn't have messed up the actual codebase by leaving the default master/main branch as it is.
After you've committed your changes, it's time to push them to Github and merge whatever changes you've done on the separate branch of your repo to the main branch of the Org's repo. So you make a Pull Request asking the project's maintainers to merge your changes into their own repo's master/main branch. They will review your changes, and if they like those changes, they'll finally merge them.
Always remember, 1 branch = 1 pull request, and for every separate change being made to the repo or for every separate feature you add or bug you resolve from the project, create a separate pull request via creating a new branch for each one of them.
Resolving Merge Conflicts
Suppose 2 or more people are working on the same project, and there's a file that exists in which changes are being made by multiple people. If they have made changes in the same file at the same line number, then it's obviously a confusing scenario for git, making it unable to choose which change to be taken.
So these cases are needed to be resolved by the project's maintainers on their own. They will review each change and then will decide which change to keep.
So with that being said, I finally end my Git-GitHub tutorial here. We learnt several git commands such as - status, init, add, commit, log, remote, push, pull, branch, checkout, origin/upstream, fetch, clone, reset, restore, rebase, stash, etc. We also covered branching in git and how we can contribute to open source projects. We looked into several features of github that include - Forking an existing repo, Creating a Pull request and resolving merge conflicts.
I hope you enjoyed both the blogs, Thanks for reading😄